February 24 – National Tortilla Chip Day

celebrate-picture-books-picture-book-review-round-is-a-tortilla-a-book-of-shapes-cover-2

About the Holiday

If the tortilla-making machine had produced perfect rounds every time back in the 1950s, the world may never have known the crunchy deliciousness of tortilla chips. Back in the day, Rebecca Webb Carranza and her husband owned the El Zarape Tortilla Factory in Los Angeles, California and were one of the first to automate tortilla production.

Instead of wasting the odd-shaped ones, Carranza cut them into triangles, fried them, and sold them in bags.They were a hit! People all over began enjoying them dipped in salsa and guacamole and smothering them in cheese. In 1994 Carranza was honored with the Golden Tortilla Award for her contributions to the Mexican food industry, and in 2003 Texas named the tortilla chip the official state snack!

Round is a Tortilla: A Book of Shapes

Written by Roseanne Thong | Illustrated by John Parra


“Round are sombreros. / Round is the moon. / Round are the trumpets that blare out a tune. Round are tortillas and tacos too. / Round is a pot of abuela’s stew. / I can name more round things can you?” With wonderful, lyrical verses, Roseanne Thong introduces children to the shapes—circles, squares, triangles, rectangles, ovals, stars, and more—that make up their multicultural world.

celebrate-picture-books-picture-book-review-round-is-a-tortilla-squares

Image copyright John Parra, 2013, text copyright Roseanne Thong, 2013. Courtesy of Chronicle Books.

Here are round chiming campanas and nests full of swallows, square ventanas for peering through and clocks for telling time. Rectangles are cold paletas to eat on a hot summer day and the ice-cream carts that deliver them, and triangles make tasty quesadillas and gliding sailboats. Each verse ends with an invitation for kids to find more shapes around them—an invitation that’s hard to resist!

celebrate-picture-books-picture-book-review-round-is-a-tortilla-triangles

Image copyright John Parra, 2013, text copyright Roseanne Thong, 2013. Courtesy of Chronicle Books.

Rebecca Thong’s bright, fun-to-read verses shine with evocative words that elevate this concept book to a celebration of the sights, sounds, and sensations that make up readers’ lives. Spanish words sprinkled throughout the story enhance the theme of the book and are defined following the text. 

celebrate-picture-books-picture-book-review-round-is-a-tortilla-star

Image copyright John Parra, 2013, text copyright Roseanne Thong, 2013. Courtesy of Chronicle Books.

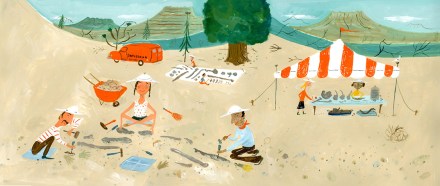
John Parra’s beautiful folk-art illustrations, which are sure to put a smile on kids’ faces, immerse readers in the daily life of a Latino town. People dance, cook, play games, walk in the park, attend a festival, and more—all while surrounded by colorful shapes. Kids will love lingering over the pages to find all of the intricate details and may well want to learn more about what they see.

Round is a Tortilla is not only a book of shapes, it makes shapes exciting! The book is a wonderful stepping stone to discussions about the places, celebrations, symbols, and decorations found on the pages for students or individuals and would be a welcome addition to any classroom or child’s bookshelf

Ages 3 – 6

Chronicle Books, San Francisco, 2013 | ISBN 978-1452106168 (Hardcover) | ISBN 978-1452145686 (Paperback)

Learn more about Roseanne Thong and her books for children and adults on her website!

View a gallery of books and artwork by John Parra on his website!

National Tortilla Chip Day Activity

CPB - Tortilla chips (2)

Homemade Baked Tortilla Cinnamon Chips

Ingredients

  • 2 10-inch flour tortillas
  • ¾ Teaspoon Cinnamon
  • 2 ½ Tablespoons Sugar
  • Butter

Directions

  1. Preheat oven to 350 degrees
  2. Combine the cinnamon and the sugar in a bowl
  3. Butter the tortillas
  4. Sprinkle the tortillas with the cinnamon sugar mixture
  5. Cut the tortillas into 8 pieces
  6. Place pieces on a baking sheet
  7. Bake in 350-degree oven for 12 – 15 minutes
  8. Chips will become crispier as they cool.

Makes 16 chips

celebrate-picture-books-picture-book-review-round-is-a-tortilla-a-book-of-shapes-cover-2

You can find Round is a Tortilla: A Book of Shapes at these booksellers

Amazon | Barnes & Noble | Books-a-Million | IndieBound


February 23 – National Dog Biscuit Day

CPB - Dog Biscuit

About the Holiday

People have holidays celebrating their favorite treats—like Cherry Pie Day and Chocolate Chip Cookie Day—so dogs should have a food holiday of their own, right? Well, today is it! Today we remember that our best furry friends like to be rewarded with a special treat or just shown a little extra love with a tasty morsel.

Before anyone thought about what dogs ate, dog “treats” included some pretty awful stuff—moldy bread, rotten leftovers…but an American named James Spratt was struck by an idea when he saw stray, hungry dogs looking for food on one of his travels in England in the 1800s. He created the first dog biscuit, which was more like cake, made of fresh ingredients such as meat, grain, and vegetables. The first commercial dog biscuit was developed in 1908 by the F. H. Bennett Biscuit Co. It was hard and made with meat products, milk, and important minerals.

Dog Biscuit

By Helen Cooper


In Helen Cooper’s delightfully evocative Dog Biscuit, Bridget can’t resist eating a treat from the enticing bag she finds in Mrs. Blair’s shed. The biscuit looks like a people cookie; it even tastes good—salty and sweet—but really it’s meant for a dog, not a little girl! Mrs. Blair shakes her head when she recognizes the crumbs around Bridget’s mouth and teases that now Bridget will turn into a dog. As children often do with adults’ jokes, Bridget takes this notion literally, setting in motion a day-long flight of fancy—with a bit of trepidation.

Bridget’s imagination runs as wild as a pack of dogs—does that itch behind her ears mean they’re growing? How is it possible she’s wagging goodbye? And did Mrs. Blair’s dog really just say it used to be a real boy? She begins to regret eating that biscuit but is determined not to tell her mother, especially since she doesn’t seem to notice any difference in her daughter.

As she and her mother walk home from Mrs. Blair’s, Bridget suddenly finds herself awakened to a new world. She identifies with every dog she meets, savors the aroma of the butcher shop, and forgets her people manners at the dinner table. Still, her mother doesn’t notice. Before finally curling up and falling asleep, Bridget again wishes she hadn’t eaten that biscuit.

In sleep Bridget unleashes her full imagination, romping with a pack of new friends through familiar sites now transformed into a mystical doggy paradise that makes her very glad she ate that biscuit—that is until she thinks of her family and howls. At last her mom, who was indeed aware of her daughter’s turmoil, can comfort her. In her mother’s arms Bridget reveals her fears and allows herself to be reassured.

The next day Bridget visits Mrs. Blair, who explains that she was joking and apologizes for worrying her. Over tea and “human being treats” Bridget happily leaves puppyhood behind.

Author-illustrator Helen Cooper beautifully captures Bridget’s imagination, turmoil, and joyous abandon through her vibrant illustrations that are awash in color, swirling lines, clever details, and the use of various type sizes and fonts. Wide-eyed Bridget, her family, Mrs. Blair, and the many dogs that populate this book are exquisitely drawn. Kids will love sniffing out the hidden dogs on every page.

A recipe for Human-Being Treats is included.

Ages 4 – 8

Farrar Straus and Giroux, New York, 2009 | ISBN 978-0374318123

National Dog Biscuit Day Activity

CPB - Dog Biscuits

Homemade Dog Treats

Making homemade dog biscuits is a fun way to spend time together and benefit furry friends. These biscuits make tasty treats for your own pet or consider making a batch to donate to your local animal shelter. This recipe is easy and proven to be a favorite.

Children should get help from an adult when using the oven.

Supplies:

  • 1 large bowl
  • Large spoon or whisk
  • Cookie cutters – shaped like traditional dog biscuits or any favorite shape

Ingredients

  • 3 cups Buckwheat flour
  • ½ cup powdered milk
  • 1 teaspoon salt
  • ¾ cup water
  • 1/3 cup margarine or butter, melted
  • 1 egg beaten

Directions

  1. Preheat oven to 325 degrees
  2. Add buckwheat flour to bowl
  3. Add powdered milk to bowl
  4. Add salt to bowl
  5. Stir to mix dry ingredients
  6. Add water
  7. Add melted margarine or butter
  8. Add egg
  9. Stir until liquid is absorbed
  10. Knead for a few minutes to form a dough
  11. If the dough is too dry, add a little more water, 1 Tablespoon at a time
  12. Place the dough on a board
  13. Roll dough to ½ inch thickness
  14. Cut into shapes with cookie cutters
  15. Bake at 325 degrees for 35 minutes
  16. Biscuits will be hard when cool.

Makes about 40 biscuits

February 22 – Museum Advocacy Day

CPB - How the Dinosaur Got to the Museum II

About the Holiday

Today is a day when we can show our museum curators and representatives in government how much we value museums. Without these grand (and sometimes small) buildings dedicated to preserving and teaching about our historical, scientific, and cultural achievements, our lives would be much poorer. Show your support for museum funding by visiting and/or donating to your favorite museum!

Another wonderful way to celebrate our custodians of history, science, art, and life is by reading the clever How the Dinosaur Got to the Museum / How the Sphinx Got to the Museum / How the Meteorite Got to the Museum series by author-illustrator Jessie Hartland.

How the Dinosaur Got to the Museum

By Jessie Hartland


“So…” asks a little boy visiting the Smithsonian Museum of Natural History, “how did the dinosaur get to the museum?” Thus begins the tale—not of the dinosaur’s life, but of its journey from life to the museum exhibit hall.

celebrate-picture-books-picture-book-review-how-the-dinosaur-got-to-the-museum-talking-about-dinosaur

Image and text copyright Jesse Harland, courtesy of Blue Apple Books

One hundred and forty-five million years ago, the dinosaur roamed the plains of what is now Utah, Overcome by weather and evolutionary events, the dino is buried and much, much later once again exposed. A Dinosaur Hunter finds one large bone and believes it to be from a Diplodocus Longus. He calls in the Paleontologist who confirms it. A team of Excavators arrives and unearths the rest of the skeleton.

The Movers pack the skeleton which was found by the Dinosaur Hunter, confirmed by the Paleontologist, and dug up by the Excavators and load it on a train that transports it to the Smithsonian. Here, the bones are cleaned and preserved by the Preparators, who discover that the head and neck are missing!

celebrate-picture-books-picture-book-review-how-the-dinosaur-got-to-the-museum-digging

Image copyright Jesse Harland, courtesy of Blue Apple Books

The Curator locates a plaster cast at another museum and work continues. The Diplodocus is assembled, but in the darkness the Night Watchman trips over its tail and breaks it! In come the Welders to fix it, and finally the Riggers can display the skeleton.

The Exhibits Team creates a background, lighting, and signs for Diplodocus, and the Cleaners give it a final dusting before the Director invites the public to view the magnificent exhibit with a speech and a toast.

celebrate-picture-books-picture-book-review-how-the-dinosaur-got-to-the-museum-exhibit

Image copyright Jesse Harland, courtesy of Blue Apple Books

Jessie Hartland’s bold, colorful illustrations offer a child’s-view perspective on the behind-the-scenes working of a museum, while her highly entertaining and educational text will keep kids giggling and reciting along as each page builds on the next to reveal the story of the men, women, and processes engaged in creating a museum exhibit.

Ages 5 – 9

Blue Apple Books, New Jersey, 2011 | ISBN 978-1609050900

Museum Advocacy Day Activity

CPB - Cookie Jar Museum (2)

Create a Museum Exhibit

Every item has a story. Is there a funny anecdote behind that knick-knack on the shelf? Does your favorite serving dish hold sentimental value? A fun and educational way for kids to learn family stories and interact with their own history is to create a museum exhibit of objects in your home.

For teachers this can be a fun classroom activity that incorporates writing, art, and speaking, and categorizing skills. Students can use objects in the classroom or bring items from home to set up museum exhibits. This activity can be done as a whole-class project or by smaller groups, who then present their exhibit to the rest of the class.

Supplies

  • A number of household or classroom items
  • Paper or index cards
  • Markers
  • A table, shelf, or other area for display

Directions

  1. To get started have children gather a number of items from around the house to be the subjects of their exhibit. An exhibit can have a theme, such as Grandma’s China or Travel Souvenirs, or it can contain random items of your child’s choice, such as toys, plants, tools, even the furniture they see and use every day.
  2. Using the paper or cards and markers, children can create labels for their exhibit items. Older children will be able to write the labels themselves; younger children may need adult help.
  3. Spend a little time relating the story behind each object: where it came from, how long you’ve had it, when and how it was used in the past, and include any funny or touching memories attached to the item. Or let your child’s imagination run free, and let them create histories for the objects.
  4. When the labels are finished, arrange the items on a table, shelf, or in a room, and let your child lead family members or classmates on a tour. You can even share the exhibit with family and friends on social media.
  5. If extended family members live in your area, this is a wonderful way for your child to interact with them and learn about their heritage.

February 21 – International Mother Language Day

CPB - The Little Rabbit Who Liked to Say Moo

About the Holiday

Established in 1999 by UNESCO, Mother Language Day celebrates cultural diversity and promotes the protection of endangered languages. Events include multicultural festivals where all voices are heard and social cohesion, cultural awareness, and tolerance are honored.

The Little Rabbit Who Liked to Say Moo

By Jonathan Allen


Little Rabbit sits in the farmer’s field listening to the animals talk and learning their languages. “Moo,” Little Rabbit repeats, “Moo.” A calf responds and questions Little Rabbit. It turns out that Little Rabbit knows and likes many languages. Calf joins Rabbit in the fun. “Baa,” they say together, which summons Lamb. The three friends decide to try “Oink.” With each new noise, the group expands and enthusiastically continues their linguistic experiment. Finally, after a rousing chorus of “Quack,” Duckling asks if quack is their favorite animal sound. Each animal then reveals with pride that, while they like other noises, they prefer their own. But what about Little Rabbit, who doesn’t “have a big noise?” Will Rabbit’s answer begin the game again?

The wide-eyed, smiling animals in this adorable picture book by author-illustrator Jonathan Allen perfectly captures the joyous camaraderie of good friends discovering the world together. The book is a wonderful introduction for young children to the ideas of inclusiveness and self-esteem. Kids will love the repetition as each new animal joins the group, and will have as much fun saying each sound as Little Rabbit and the other farmyard friends.

Ages 2 – 6

Boxer Books Limited, 2008  ISBN 978-1910126257

International Mother Language Day Activity

CPB - Rabbit Puppet made

Make a Rabbit Puppet

Supplies

  • Rabbit Puppet Template
  • A paper lunch bag
  • Markers, crayons, or colored pencils
  • Cotton Ball
  • Scissors
  • Glue or tape

Directions

  1. Print the Rabbit Puppet template.
  2. Color the parts of the rabbit and cut them out.
  3. Place the flat paper bag on a table with the bottom flap facing you. Glue or tape the eyes, and the nose and whiskers to the bottom flap. Attach the ears, placing the tabs behind the top of the bottom flap. Attach the paws to the body below the bottom flap. Attach the cotton ball tail to the opposite side of the bag.  
  4. When it’s dry, use your puppet to read The Little Rabbit Who Liked to Say Moo again and play along. Let your Little Rabbit try saying “Hi” in the languages below.

Learn to Say “Hello” in Other Languages

  • Spanish: Hola (oh-la)
  • French: Bonjour (bon zhur)
  • German: Hallo (hă-lo)
  • Chinese: Nin Hao (nee hah)
  • Filipino: Kamusta (ka-muh-stah)
  • Italian: Ciao (chi-ow)
  • Japanese: Kon’nichiwa (ko-nee-chee-wah)
  • Turkish: Merhaba (mĕr-hah-bah)


February 20 – National Cherry Pie Day

How to Make a Cherry Pie and See the U.S.A. picture book review

About the Holiday

Today we celebrate a most delicious day! It’s hard not to love pie with its flaky crust and sweet filling. Pies have been served since ancient days, originating with the Romans who, like our own English and American ancestors, discarded the crust before eating it (didn’t they know what they were missing?).

Here are a few rather surprising facts about pie

  • Early pies were mostly made of meat, poultry in particular. The legs of the bird were often left to hang over the side of the dish and used as handles (is this what’s called “getting a leg up”?).
  • Fruit pies probably originated in England in the 1500s.
  • We have the bakers for Queen Elizabeth I to thanks for the first cherry pie.
  • Pie was introduced to America by the first English settlers. It was baked in long narrow pans that the settlers called “coffyns” after pie crusts in their native country.
  • During the American Revolution the term coffyn was changed to “crust” (“Those pesky Redcoats! We don’t want our words to be like theirs!”)

To celebrate today’s holiday, enjoy a slice of cherry pie, read this book, and have fun with the puzzle!

How to Make a Cherry Pie and See the U.S.A.

By Marjorie Priceman


In this clever recipe/travelogue combination, Marjorie Priceman takes children on a tour of the United States as they gather the materials to make the tools needed to bake a cherry pie. Sure, it’s easy to buy the bowls, spoons, pie pan, baking sheet, pot holders, and other items required, but where do these things really come from?

With each page kids will vicariously travel across the country with the young baker as she visits Pennsylvania and Ohio for coal to make baking sheets, Mississippi for the cotton needed to sew pot holders, New Mexico for potting clay, and Washington, Hawaii, New Hampshire, Texas, and other states in her pursuit of materials. Along the way, they will learn fun facts about the states and what makes each one special.

The girl joins people playing and working at all kinds of job as she journeys by boat, plane, car, and bus in Priceman’s vibrant and engaging illustrations. Each state is depicted with its unique characteristics, and Priceman has included so many details that kids will love lingering over each page. Curious kids may want to explore more about the subjects they discover in this creative picture book.

Ages 5 – 8

Dragonfly Books, 2013 | ISBN 978-0385752930

Cherry Pie Day Activity

CPB - Cherry Pie Match

Mixed Up Cherry Pies Matching Game

You baked 8 cherry pies for the Cherry Pie Day Festival – 2 of each crust pattern. But they got mixed up! Can you connect the matching cherry pies? Print the Mixed Up Cherry Pies Matching Game Template and draw a line between the matching pies. 

February 19 – Bird Feeding Day

National Geographic Kids Bird Guide of North America picture book review

About the Holiday

Today we take time to remember our feathered friends who may have a difficult time finding food during the winter months. Hanging a bird feeder in your yard can bring many hours of entertainment and enjoyment as you get to know the birds in your area and see many of the same birds come back again and again—often with their little ones during the spring!

National Geographic Kids Bird Guide of North America

By Jonathan Alderfer


If you’re looking for a book to learn about the birds in your own backyard or across the country, it’s hard to beat the National Geographic Kids Bird Guide! The prominent birds from 10 habitats in North America are discussed in detail, with amazing close-up action photographs from some of the top nature photographers in the country. Major profiles of the most common birds in a region include information on basic facts, a map and the environment in which they’re found, the sounds they make, food they eat, body parts and what they are used for, nesting behavior, and fun trivia. Mini profiles highlight other birds seen in each area.

The Guide also includes instructions on many how-tos, such as making a bird feeder, making a bird bath, bird watching, building a nest, drawing birds, protecting birds and their environment, and more. There is also a glossary and a list of print and website resources for budding birders.

Ages 7 – 10

National Geographic Kids Books, 2013 | ISBN 978-1426310942

Bird Feeding Day Activity

CPB - Bird Feeder I (2)

Pinecone Birdfeeder


Making a pinecone bird feeder is a quick, fun way to nourish your backyard friends! Here are some simple directions for making your own!

Supplies

  • Large pinecone
  • Vegetable shortening
  • Birdseed
  • String
  • Knife or popsicle stick
  • Spoon
  • 2 Bowls

Directions

  1. Tie a length of string around one of the top layers of pinecone leaves and knot it to make a loop for hanging.
  2. Spoon about 1/3 cup of vegetable shorting into a bowl
  3. With the knife spread the shortening over the leaves of the pinecone, covering it completely.
  4. Pour birdseed into a bowl
  5. Roll the pinecone in the bowl of birdseed, patting seed into the crevices and around the sides.
  6. Hang your pinecone birdfeeder on a branch or pole and watch the birds enjoy it!

February 18 – National Battery Day

Using Batteries Picture Book review

About the Holiday

While not an official holiday, National Battery Day is a great time to think about how these small, ubiquitous power cells have changed and improved our lives, allowing us to take our gadgets and our necessities wherever we go. Batteries themselves may be relatively new, but the idea may have been around for 2,000 years. In 1936 archaeologist Wilhelm Konig unearthed a clay jar from a Parthian tomb that held an iron rod encased in copper that may have been used to electroplate gold onto silver.

It was Benjamin Franklin (of course it was!) who coined the term “battery” in 1748 to describe an array of charged glass plates. The word “volt” or a battery’s electric potential comes from Alessandro Volta, who in 1800 generated electrical current by layering silver, a material soaked in salt or acid, and zinc. William Cruickshank, an English chemist, advanced this method, and in 1802 created a battery for mass production. The first commercially available battery was introduced in 1896 by the company now known as Eveready, and we were off and charging!

It’s Electric Series: Using Batteries

By Chris Oxlade

Batteries—those things that make our our cars run, our TV remotes change channels, our little book lights glow, and so much more—are part of our lives from the very beginning, when they’re required (but not included) for our favorite toys. But how many of us really know how they work? This little book explains to children in simple and easily understood language how batteries store and use electricity to fuel many of the world’s machines and gadgets.

Large photographs accompany the text and clearly demonstrate the concepts. Children will learn about using batteries, how batteries work in circuits, the different battery shapes and sizes, battery materials, rechargeable batteries, battery safety, portable power, and more!

For kids interested in electricity – and batteries in particular – theIt’s Electric series of books is a great place to start learning!

Battery Day Activity

Connect the Battery Puzzle

CPB - Battery Day maze

Hmmm…The flashlight, watch, video game controller, and smoke detector are all broken! Can you find which battery goes into which object to make them work again? Print out the Connect the Battery puzzle here.