

About the Holiday
Created in 1946, the International Council of Museums established International Museum Day in 1977 to institute an annual event highlighting museums as “important means of cultural exchange, enrichment of cultures and development of mutual understanding, cooperation, and peace among peoples.” The day also aims to unify “the creative aspirations and efforts of museums and draw the attention of the world public to their activity.” Each year a theme is chosen to spotlight a relevant issue. This year’s theme is “Museums and contested histories: saying the unspeakable in museums.” Museums around the world will take the opportunity to show how they “display and depict traumatic memories to encourage visitors to think beyond their own individual experiences” and promote peace and reconciliation for the future. To learn more visit the International Council of Museums website!
To celebrate today’s holiday show your support for museums by visiting and/or donating to your favorite museum!
How the Dinosaur Got to the Museum
By Jessie Hartland
“So…” asks a little boy visiting the Smithsonian Museum of Natural History, “how did the dinosaur get to the museum?” Thus begins the tale—not of the dinosaur’s life, but of its journey from life to the museum exhibit hall.

Image and text copyright Jesse Harland, 2011, courtesy of Blue Apple Books.
One hundred and forty-five million years ago, the dinosaur roamed the plains of what is now Utah. Overcome by weather and evolutionary events, the dino is buried. It is only much, much later that this prehistoric creature is once again exposed. A Dinosaur Hunter finds one large bone and believes it to be from a Diplodocus Longus. He calls in the Paleontologist who confirms it. A team of Excavators arrives and unearths the rest of the skeleton.
The Movers pack the skeleton that was found by the Dinosaur Hunter, confirmed by the Paleontologist, and dug up by the Excavators. They load it onto a train that transports it to the Smithsonian Museum of Natural History. Here, the bones are cleaned and preserved by the Preparators, who discover that the head and neck are missing!
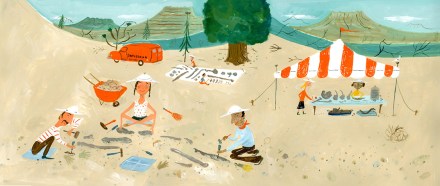
Image copyright Jesse Harland, 2011, courtesy of Blue Apple Books.
The Curator locates a plaster cast of a Diplodocus head at another museum, and work continues until the whole Diplodocus is assembled. That night while making his rounds in the dark, the Night Watchman trips over the skeleton’s tail and breaks it! In come the Welders to fix it. Finally, the Riggers can lift the dinosaur into the display.
The Exhibits Team creates an educational background for Diplodocus. Then with a final dusting, the Cleaners make the Diplodocus presentable. At long last, the Director invites the public into the museum. He gives a speech and makes a toast then opens the doors to the magnificent exhibit.

Image copyright Jesse Harland, 2011, courtesy of Blue Apple Books.
Jessie Hartland’s highly entertaining and educational text will keep kids riveted to the process of creating a museum exhibit even as they giggle at the mishaps. As each page and step in the process build on each other, readers will enjoy reciting along. Hartland’s bold, colorful, folk-style illustrations allow kids to see the lengthy and meticulous journey the dinosaur skeleton makes from burial spot to museum exhibit. Along the way, they view the desert landscape where the skeleton was found, view the tools used to excavate and preserve it, get a tour of the back rooms where the dinosaur bones are reassembled, and are given a front-row look at the finished display.
For children interested in dinosaurs, museums, history, and a fun story, How the Dinosaur Got to the Museum is a great take-along book for museum trips and a wonderful addition to a young armchair traveler’s library
Ages 5 – 9
Blue Apple Books, New Jersey, 2011 | ISBN 978-1609050900
Learn more about Jesse Hartland, her books, and her artwork on her website!
International Museum Day Activity

Create a Museum Exhibit
Every item has a story. Maybe there’s a funny anecdote behind that knick-knack on your shelf. Perhaps your favorite serving dish holds sentimental value. How about your child’s best-loved toy or a drawing or craft they’ve made? A fun and educational way for kids to learn family stories and interact with their own history is to create a museum exhibit of objects in your home.
For teachers this can be a fun classroom activity that incorporates writing, art, and speaking as well as categorizing skills. Students can use objects in the classroom or bring items from home to set up museum exhibits. This activity can be done as a whole-class project or by smaller groups, who then present their exhibit to the rest of the class.
Supplies
- A number of household or classroom items
- Paper or index cards
- Markers
- A table, shelf, or other area for display
Directions
- To get started help children gather a number of items from around the house to be the subjects of their exhibit. An exhibit can have a theme, such as Grandma’s China or Travel Souvenirs, or it can contain random items of your child’s choice, such as toys, plants, tools, even the furniture they see and use every day.
- Using the paper or cards and markers, children can create labels for their exhibit items. Older children will be able to write the labels themselves; younger children may need adult help.
- Spend a little time relating the story behind each object: where it came from, how long you’ve had it, when and how it was used in the past, and include any funny or touching memories attached to the item. Or let your child’s imagination run free, and let them create histories for the objects.
- When the labels are finished, arrange the items on a table, shelf, or in a room, and let your child lead family members or classmates on a tour. You can even share the exhibit with family and friends on social media.
- If extended family members live in your area, this is a wonderful way for your child to interact with them and learn about their heritage.


